Saturday, February 20, 2016

Writing microservices with WSO2 MSF4J


WSO2 has concluded another WSO2Con conference in grand style. The WSO2Con Asia 2016 has had special focus on the new WSO2 Microservices Framework for Java (WSO2 MSF4J in short) product. I have done a tutorial on how to write microservices with WSO2 MSF4J on the AppDev track. You can see the Agenda here - https://asia16.wso2con.com/agenda/

The WSO2 MSF4j is a lightweight, fast runtime with an annotation-based programming model that offers to create microservices in Java with container-based deployment in mind. Microservices developed using WSO2 MSF4J can boot in just a few milliseconds in a Docker container and can easily be added to a Docker image definition.

In the tutorial, we have covered the following topics -
  • Introduction to Microservices Architecture (MSA)
  • Introducing key features of WSO2 MSF4J
  • Developing microservices with WSO2 MSF4J
  • Monitoring and securing microservices with WSO2 MSF4J
  • Introducing new features of WSO2 Application Server


Friday, September 25, 2015

WSO2 Application Server (WSO2 AS) 5.3.0 Release


WSO2 Application Server 5.3.0 has been released on top WSO2 Carbon Kernel 4.4.1. See the release note below to find out the cool and exciting features of this latest release. 


The WSO2 Application Server is an enterprise-ready cloud-enabled application server, powered by Apache Tomcat, and Apache TomEE, it integrates Apache CXF framework. It provides first class support for standard Web applications, JAX-WS/JAX-RS applications and Jaggery scripting applications. Coupled with features of WSO2 Carbon, users can now manage their applications including JAX-WS and JAX-RS to web applications in a unified manner within the management console itself.

WSO2 Application Server also provides a comprehensive Web services server platform using CXF as its Web services runtime, and provides many value additions on top of this runtime. It can expose services using both SOAP and REST models and supports a comprehensive set of WS-* specifications such as WS-Security, WS-Trust, WS-SecureConversation, WS-Addressing, WS-SecurityPolicy, etc. WSO2 Application Server also has inbuilt support for Jaggery. WSO2 Application Server can be installed on on-premise or any public/private cloud infrastructure and provide unified management console and lifecycle management features which are independent from underlying deployment option.

An open source product, WSO2 Application Server is available under the Apache Software License (v2.0) . This includes all of the extra integration and management functionality as well. 
For more information on WSO2 Application Server and to download the product please visit http://wso2.com/products/application-server

New Features
  • JavaEE 6 Web Profile support via TomEE 1.7.2 integration
  • WebSocket 1.1 API Support as defined by the JSR-356 specification
  • Tomcat Virtual Hosts support
  • SAML2 Single-Sign-On support for web applications
  • WS-Discovery support for CXF JAX-WS and JAX-RS services
  • OSGi ServiceLoader Mediator specification support via SPI-Fly
Key Features

  • Support for Servlet 3, JSP 2.2, EL 2.2, JSTL 1.2 specifications.
  • Full JAX-WS 2.2 and JAX-RS 2.0 Specification support
  • Integration of Jaggery - server side scripting framework
  • Unified Application listing and management UI for WebApps, JAX-WS/RS, Jaggery
  • Multi Tenant support for standalone deployment
  • 100% Apache Tomcat compliance runtime
  • Lazy loading for web applications and services
  • AppServer tooling - AppServer related artifacts can be easily generated using WSO2 Developer Studio
  • Clustering support for High Availability and High Scalability
  • Full support for WS-Security, WS-Trust, WS-Policy and WS-SecureConversation
  • JMX and Web interface based monitoring and management
  • WS-* and REST support
  • GUI, command line, and IDE based tools for Web service development
  • Equinox P2 based provisioning support
  • WSDL2Java/Java2WSDL/WSDL 1.1 and try it (invoke any remote Web service)

Wednesday, December 17, 2014

WSO2 BAM - APIM error - Failed to write data to database


When viewing statistics of APIs in WSO2 API Manager 1.7.0 via WSO2 BAM, you may have come across the following issue. [1]

As you might know, AM sends events about requests to APIs to WSO2 BAM. And, BAM stores these data in Cassandra storage which gets later by Hive analytics scripts. For AM, we have the am_stats_analyzer. After analyzing, the summarized information gets written to a RDBMS instance. The summarized db could be mysql, oracle or even a in-memory H2 DB.

Error


This error [1] comes when a column in a summarized database table is too small to store a given value. In this, it's the resourcePath of an API. By default, the size for the resourcePath column is set to VARCHAR(100). If the resourcePath of an API is longer than 100 characters, then this error will be thrown.

Solution

The 'resourcePath' is defined in the API_Resource_USAGE_SUMMARY table in the summary db.

  • If the system is already up and running, the summarized mysql tables are already created. Therefore, we need to alter the tables to modify column lengths. You can use the following steps for that.

1. Since the issue is in a RDBMS such as mysql, you first need to log-in to console where you can execute SQL statements.
2. Then, execute the following statement.

alter table API_Resource_USAGE_SUMMARY modify resourcePath MEDIUMTEXT


  • If the summarized tables are not created yet, then you could go and and modify the table creation script in the am_stats_analyzer.
  1. Open the API_Manager_Analytics.tbox.
  2. In there, you will find am_stats_analyzer analytics script.
  3. Open that, and look for the hive.jdbc.table.create.query, which has the following summary table creation sql statement.
 CREATE TABLE API_Resource_USAGE_SUMMARY ( api VARCHAR(100), version VARCHAR(100),apiPublisher VARCHAR(100) , consumerKey VARCHAR(100),resourcePath VARCHAR(100) ,context VARCHAR(100),
        method VARCHAR(100), total_request_count INT, hostName VARCHAR(100), year SMALLINT, month SMALLINT, day SMALLINT, time VARCHAR(30), PRIMARY KEY(api,version,apiPublisher,consumerKey,context,method,time))


Change the type of resourcePath from VARCHAR(100) to MEDIUMTEXT. Save the script.

[1]
ERROR {org.wso2.carbon.hadoop.hive.jdbc.storage.db.DBOperation} - Failed to write data to database {org.wso2.carbon.hadoop.hive.jdbc.storage.db.DBOperation}
com.mysql.jdbc.MysqlDataTruncation: Data truncation: Data too long for column 'resourcePath' at row 1
        at com.mysql.jdbc.MysqlIO.checkErrorPacket(MysqlIO.java:3885)
        at com.mysql.jdbc.MysqlIO.checkErrorPacket(MysqlIO.java:3823)
        at com.mysql.jdbc.MysqlIO.sendCommand(MysqlIO.java:2435)
        at com.mysql.jdbc.MysqlIO.sqlQueryDirect(MysqlIO.java:2582)
        at com.mysql.jdbc.ConnectionImpl.execSQL(ConnectionImpl.java:2530)
        at com.mysql.jdbc.PreparedStatement.executeInternal(PreparedStatement.java:1907)
        at com.mysql.jdbc.PreparedStatement.executeUpdate(PreparedStatement.java:2141)
        at com.mysql.jdbc.PreparedStatement.executeUpdate(PreparedStatement.java:2077)
        at com.mysql.jdbc.PreparedStatement.executeUpdate(PreparedStatement.java:2062)
        at org.wso2.carbon.hadoop.hive.jdbc.storage.db.DBOperation.insertData(DBOperation.java:175)
        at org.wso2.carbon.hadoop.hive.jdbc.storage.db.DBOperation.writeToDB(DBOperation.java:63)
        at org.wso2.carbon.hadoop.hive.jdbc.storage.db.DBRecordWriter.write(DBRecordWriter.java:35)
        at org.apache.hadoop.hive.ql.exec.FileSinkOperator.processOp(FileSinkOperator.java:589)
        at org.apache.hadoop.hive.ql.exec.Operator.process(Operator.java:467)
        at org.apache.hadoop.hive.ql.exec.Operator.forward(Operator.java:758)
        at org.apache.hadoop.hive.ql.exec.SelectOperator.processOp(SelectOperator.java:84)
        at org.apache.hadoop.hive.ql.exec.Operator.process(Operator.java:467)
        at org.apache.hadoop.hive.ql.exec.Operator.forward(Operator.java:758)
        at org.apache.hadoop.hive.ql.exec.SelectOperator.processOp(SelectOperator.java:84)
        at org.apache.hadoop.hive.ql.exec.Operator.process(Operator.java:467)
        at org.apache.hadoop.hive.ql.exec.Operator.forward(Operator.java:758)
        at org.apache.hadoop.hive.ql.exec.GroupByOperator.forward(GroupByOperator.java:964)
        at org.apache.hadoop.hive.ql.exec.GroupByOperator.processAggr(GroupByOperator.java:781)
        at org.apache.hadoop.hive.ql.exec.GroupByOperator.processOp(GroupByOperator.java:707)
        at org.apache.hadoop.hive.ql.exec.Operator.process(Operator.java:467)
        at org.apache.hadoop.hive.ql.exec.ExecReducer.reduce(ExecReducer.java:248)
        at org.apache.hadoop.mapred.ReduceTask.runOldReducer(ReduceTask.java:518)
        at org.apache.hadoop.mapred.ReduceTask.run(ReduceTask.java:419)

Tuesday, December 2, 2014

Fixing 101505 WSO2 Connection close issues


Error:

The error code 101505 means the HTTP connection initiated by the ESB has been terminated at the backend. According to the log you can determine whether message has been completely written to the backend prior to the connection close (See [Status SendingCompleted : true] in the log.) Users will usually get an error message such as the following.

{
fault: {
code: "101505"
type: "Status report"
message: "Runtime Error"
description: "Connection close For : x.x.x.x For Request : Axis2Request [Message ID : urn:uuid:84445830-ed4e-5c15-cd87-bb5b21869e3f] [Status Completed : false] [Status SendingCompleted : true]"
}


Possible fix:


Some Back-end servers do not support persistent connections. So, they tend close down the connections intermediately. If this is the case, then we should disable the Keep-Alive connections at ESB side for such back-ends.


By default Keep-Alive is enabled in WSO2 ESB/APIM. You can switch off this per proxy/api by adding the following property mediator.


<property name="NO_KEEPALIVE" value="true" scope="axis2"/> 


But If you need to disable Keep-Alive globally for all the connections initiated from ESB, then that configuration should be specified in transport configuration files.

So, if you are using NIO transport, then add the following property to ESB_HOME/repository/conf/nhttp.properties. But, if you are using Passthru transport, then add the following property to ESB_HOME/repository/conf/passthru-http.properties.


http.connection.disable.keepalive=1

Saturday, November 29, 2014

Restrict WSO2 Carbon management console access


The WSO2 Carbon products provides users with a browser based management console to administer the WSO2 products. All the WSO2 products comes with a management console to make the administration easier. When hosting the products ready for production, it's imperative to restrict the access to the mgt console from the external network.

Following steps shows how to restrict the access to WSO2 Carbon management console by IP.

Carbon itself gets added to the Tomcat runtime as a webapp. The "/carbon" is a servlet under it. Hence, we can use the Tomcat servlet filter, org.apache.catalina.filters.RemoteAddrFilter to restrict access.


1. Open CARBON_HOME/repository/conf/tomcat/carbon/WEB-INF/web.xml
2. Then, add the filter, org.apache.catalina.filters.RemoteAddrFilter, as follows. This filter can be used to restrict access by IP. Following is an example valve configuration to restrict the access only to localhost (considering both IPv4 and IPv6).


<filter>
    <filter-name>Remote Address Filter</filter-name>
    <filter-class>org.apache.catalina.filters.RemoteAddrFilter</filter-class>
        <init-param>
            <param-name>allow</param-name>
            <param-value>localhost|127\.\d+\.\d+\.\d+|::1|0:0:0:0:0:0:0:1</param-value>
        </init-param>
</filter>

<filter-mapping>
    <filter-name>Remote Address Filter</filter-name>
    <url-pattern>/carbon/*</url-pattern>
</filter-mapping>

For parameter value reference, see - http://tomcat.apache.org/tomcat-7.0-doc/config/valve.html#Remote_Address_Filter


Tuesday, August 5, 2014

JSF webapps fronted with reverse proxy


JSF web applications can be fronted by a reverse proxy just like any other applications, except when the reverse proxy has a different context path compared to the application server that this JSF webapp is deployed to.

Look at the following HTML content of a JSF Forms application. The 'action' URL of the form begins with a forward-slash '/'. This URL is actually a absolute url without the hostname. So, this is not a relative URL. This is a problem if your reverse proxy has a different context. Since the JSF webapp is not aware of the context path of the reverse proxy, the JSF form action will fail.

<?xml version="1.0" encoding="UTF-8"?>
<!DOCTYPE html PUBLIC "-//W3C//DTD XHTML 1.0 Transitional//EN" "http://www.w3.org/TR/xhtml1/DTD/xhtml1-transitional.dtd">
<html xmlns="http://www.w3.org/1999/xhtml">
  <h2>Welcome to Marks Calculator</h2>
  <form id="j_id_4" name="j_id_4" method="post" 
        action="/jsf-custom-viewhandler-marks/index.jsf" 
        enctype="application/x-www-form-urlencoded">
    <table cellspacing="10">
      <tbody>
        <tr>
          <td>Subject 1 marks:</td>
          <td>
            <input id="j_id_4:j_id_8" name="j_id_4:j_id_8" type="text" value="2" />
          </td>
        </tr>
        <tr>
          <td>Subject 2 marks:</td>
          <td>
            <input id="j_id_4:j_id_b" name="j_id_4:j_id_b" type="text" value="4" />
          </td>
        </tr>
      </tbody>
    </table>
    <input id="j_id_4:j_id_c" name="j_id_4:j_id_c" type="submit" value="Calculate" />
    <input type="hidden" name="j_id_4_SUBMIT" value="1" />
    <input type="hidden" name="javax.faces.ViewState" id="javax.faces.ViewState" value="wpq2AMaIFASZtUJ+IghBD2X2mhXm5MAFTDfdI20attDvNPOF " />
  </form>
</html>

Now, let's look at how the Apache HTTPD configuration might look like. Do not add forward-slash at the end of ProxyPass/ProxyPassReverse since the Location, '/as', do not have a forward-slash at the end either.


<Location /as>
    Order Deny,Allow
    Deny from none
    Allow from all
    ProxyPass http://localhost:9763 retry=0 timeout=5
    ProxyPassReverse http://localhost:9763
</Location>

Apache is configured to forward requests that come to http://localhost/as/ to http://localhost:9763/.

Now, you can access the webapp by using the request URL - http://localhost/as/jsf-custom-viewhandler-marks/index.jsf. Now, because of the JSF form 'action' URL, the form submit will try to call http://localhost/jsf-custom-viewhandler-marks/index.jsf which is non-existent.

Now, I hope you understand what's the problem here. In my view, this is a limitation of JSF. So, let's look at how to fix this.


Implementing A ViewHandler

To fix this, you need to implement javax.faces.application.ViewHandler, and register it to your webapp. In this custom view handler, we will set the action url as a relative url rather than a absolute url without the host name.

Needed dependencies -
commons-lang 2.6
commons-logging 1.1

package org.wso2.as;

import org.apache.commons.lang.StringUtils;
import org.apache.commons.logging.Log;
import org.apache.commons.logging.LogFactory;

import javax.faces.application.ViewHandler;
import javax.faces.application.ViewHandlerWrapper;
import javax.faces.context.FacesContext;
import javax.servlet.http.HttpServletRequest;
import java.net.URI;
import java.net.URISyntaxException;
import java.util.List;
import java.util.Map;

public class CustomViewHandler extends ViewHandlerWrapper {
  private static final Log log = LogFactory.getLog(CustomViewHandler.class);

  private ViewHandler wrappped;

  public CustomViewHandler(ViewHandler wrappped) {
    super();
    this.wrappped = wrappped;

  }

  @Override
  public ViewHandler getWrapped() {
    return wrappped;
  }

  @Override
  public String getActionURL(FacesContext context, String viewId) {
    String url =  super.getActionURL(context, viewId);
    log.debug("The getActionURL: " + url);
    return addContextPath(context, url);
  }

  @Override
  public String getRedirectURL(FacesContext context, String viewId, Map<String,
          List<String>> parameters, boolean includeViewParams) {
    String url =  super.getRedirectURL(context, viewId, parameters, includeViewParams);
    log.debug("The getRedirectURL: " + url);
    return url;
  }

  @Override
  public String getResourceURL(FacesContext context, String path) {
    String url = super.getResourceURL(context, path);
    log.debug("The getResourceURL: = " + url);
    return addContextPath(context, url);
  }

  private String addContextPath(FacesContext context, String url) {
      final HttpServletRequest request = ((HttpServletRequest) 
               context.getExternalContext().getRequest());
      String result = url;
      if (url.startsWith("/")) {
          int subpath = StringUtils.countMatches(getPath(request), "/") - 1;
          String pathPrefix = "";
          if (subpath > 0) {
              while (subpath > 0) {
                  pathPrefix += "/..";
                  subpath--;
              }
              pathPrefix = StringUtils.removeStart(pathPrefix, "/");
          }
          result = pathPrefix + result;
      }
      return result;
  }

    private String getPath(final HttpServletRequest request) {
        try {
            return StringUtils.replace(new URI(request.getRequestURI()).getPath(), "//", "/");
        } catch (final URISyntaxException e) {
            return StringUtils.EMPTY;
        }
    }

}

In the addContextPath private method, we modify the original url, and replace it with a relative url.

Then, build this class into a jar and pack it into WEB-INF/lib of your web application. You can find the source and a Apache Maven build file at the end of this article.

Now, you need to register this ViewHandler with your web application. For that, open your faces-config.xml and add your view handler as follows. The faces-config.xml is usually placed under WEB-INF/ folder in the webapp.

<application>
  <view-handler>my.package.CustomViewHandler</view-handler>
</application>

Now, the faces-config.xml might look as follows.

<?xml version='1.0' encoding='UTF-8'?>
<faces-config xmlns="http://java.sun.com/xml/ns/javaee"
              xmlns:xsi="http://www.w3.org/2001/XMLSchema-instance"
              xsi:schemaLocation="http://java.sun.com/xml/ns/javaee http://java.sun.com/xml/ns/javaee/web-facesconfig_2_0.xsd"
              version="2.0">

    <application>
      <view-handler>CustomViewHandler</view-handler>
    </application>

    <navigation-rule>
        <from-view-id>/index.xhtml</from-view-id>
        <navigation-case>
            <to-view-id>/results.xhtml</to-view-id>
            <from-outcome>success</from-outcome>
        </navigation-case>
    </navigation-rule>

</faces-config>


Setting the sessionCookiePath

Some JSF webapps depends on sessions and JSESSIONID cookie. Usually, JSF sets this cookie to the webapp path. But if the reverse proxy has a different context, then the cookie fails to get stored in the browser properly. In my case, I use EJB with the JSF webapp, and I needed to fix this issue. Otherwise, I faced the below exception.

To fix this, you need to add context.xml to your webapp, and set the sessionCookiePath attribute. We can configure the JSESSIONID cookie path via this configuration file. In our case, we can set it as follows. See the tomcat documentation for more details.

<Context sessionCookiePath="/as/jsf-custom-viewhandler-marks">
</Context>

There, the path has taken into account the reverse proxy configuration path "/as".

Now you are all set. You can use the given Custom View Handler sample code in your own JSF webapps. I have also posted a sample JSF webapp that uses EJB. The sample app can be deployed Apache TomEE.

You can find a sample JSF Custom View Handler code here -

https://github.com/wso2as-developer/javaee-samples/tree/master/JSF/jsf-custom-view-handler

You can find the sample webapp here -

https://github.com/wso2as-developer/javaee-samples/tree/master/JSF/jsf-webapp-w-custom-view-handler




Tuesday, May 27, 2014

Invoke STS Service in WSO2 IS using CXF STS Client


Following guide describes how to invoke the STS Service in WSO2 Identity Server using a CXF STS client. The STS Client is configured via Spring.

As I have noticed, CXF STS client fails to invoke the STS service if you use the wso2carbon-sts wsdl to generate the client. So, I have followed a different approach.

Pre-requisites:


WSO2 Identity Server 4.6.0 or latter
Apache CXF 2.7.x

Instructions:


What I'm going to show you is using the CXF client via a simple stand-alone java class with Spring.

Configurations


1. First, you need to define the spring bean. Let's say the file is named wssec-sts-bean.xml.

<?xml version="1.0" encoding="UTF-8"?>
<beans xmlns="http://www.springframework.org/schema/beans"
       xmlns:cxf="http://cxf.apache.org/core"
       xmlns:xsi="http://www.w3.org/2001/XMLSchema-instance"
       xmlns:http="http://cxf.apache.org/transports/http/configuration"
       xsi:schemaLocation="
       http://cxf.apache.org/core   http://cxf.apache.org/schemas/core.xsd
       http://cxf.apache.org/transports/http/configuration            http://cxf.apache.org/schemas/configuration/http-conf.xsd
       http://www.springframework.org/schema/beans            http://www.springframework.org/schema/beans/spring-beans.xsd">
    <cxf:bus>
        <cxf:features>
            <cxf:logging/>
        </cxf:features>
    </cxf:bus>

<bean id="{http://ws.apache.org/axis2}wso2carbon-stsHttpsSoap12Endpoint.sts-client"
      class="org.apache.cxf.ws.security.trust.STSClient">
    <constructor-arg ref="cxf"/>
    <!--<property name="wsdlLocation" value="https://localhost:9443/services/wso2carbon-sts?wsdl"/>-->
    <property name="Location"
              value="https://localhost:9443/services/wso2carbon-sts.wso2carbon-stsHttpsSoap12Endpoint"/>
    <property name="serviceName" value="{http://ws.apache.org/axis2}wso2carbon-sts"/>
    <property name="endpointName" value="{http://ws.apache.org/axis2}wso2carbon-stsHttpsSoap12Endpoint"/>

    <property name="properties">
        <map>
            <entry key="ws-security.username" value="admin"/>
            <!--<entry key="ws-security.password" value="admin"/>-->
            <entry key="ws-security.callback-handler" value="com.cxf.sts.ClientCallbackHandler"/>
            <entry key="ws-security.encryption.properties"
                   value="bearer-client.properties"/>
            <entry key="ws-security.encryption.username" value="wso2carbon"/>
            <entry key="ws-security.sts.applies-to"
                   value="https://localhost:9453/services/echo"/>
        </map>
    </property>
</bean>
</beans>


NOTES: Please note that the wsdlLocation has NOT been set. Instead, we set the Location attribute which is the SOAP 1.2 STS https endpoint. Other attributes are the usual attributes that we normally set.

2. For the ws-security.encryption.properties property in the spring bean config, you have to  point to a properties file that has the encryption properties. The contents of bearer-client.properties would look like follows.

org.apache.ws.security.crypto.provider=org.apache.ws.security.components.crypto.Merlin
org.apache.ws.security.crypto.merlin.keystore.type=jks
org.apache.ws.security.crypto.merlin.keystore.password=wso2carbon
org.apache.ws.security.crypto.merlin.keystore.alias=wso2carbon
org.apache.ws.security.crypto.merlin.keystore.file=/opt/wso2/wso2is-4.6.0/repository/resources/security/client-truststore.jks

3. We need one more configuration file to store the ws-policy of the STS service. First, you need to secure the STS service in IS as described in this documentation - https://docs.wso2.org/display/IS460/Securing+the+Security+Token+Service
Now, if you browse to the wso2carbon-sts WSDL, you will see the policy that is applied to your service. Extract the policy element from the WSDL. It starts with <wsp:Policy ...>. If you secure the service with UsernameToken, then the policy would like below. Place it in a file called sts.policy.xml.

<wsp:Policy xmlns:wsp="http://schemas.xmlsoap.org/ws/2004/09/policy" xmlns:wsu="http://docs.oasis-open.org/wss/2004/01/oasis-200401-wss-wssecurity-utility-1.0.xsd" wsu:Id="UTOverTransport">
    <wsp:ExactlyOne  xmlns:wsp="http://schemas.xmlsoap.org/ws/2004/09/policy" xmlns:wsu="http://docs.oasis-open.org/wss/2004/01/oasis-200401-wss-wssecurity-utility-1.0.xsd" >
        <wsp:All>
            <sp:TransportBinding xmlns:sp="http://schemas.xmlsoap.org/ws/2005/07/securitypolicy">
                <wsp:Policy>
                <sp:TransportToken>
                    <wsp:Policy>
                        <sp:HttpsToken RequireClientCertificate="false"></sp:HttpsToken>
                    </wsp:Policy>
                </sp:TransportToken>
                <sp:AlgorithmSuite>
                    <wsp:Policy>
                        <sp:Basic256></sp:Basic256>
                    </wsp:Policy>
                </sp:AlgorithmSuite>
                <sp:Layout>
                    <wsp:Policy>
                        <sp:Lax></sp:Lax>
                    </wsp:Policy>
                </sp:Layout>
                <sp:IncludeTimestamp></sp:IncludeTimestamp>
                </wsp:Policy>
            </sp:TransportBinding>
            <sp:SignedSupportingTokens xmlns:sp="http://schemas.xmlsoap.org/ws/2005/07/securitypolicy">
                <wsp:Policy>
                    <sp:UsernameToken sp:IncludeToken="http://schemas.xmlsoap.org/ws/2005/07/securitypolicy/IncludeToken/AlwaysToRecipient"></sp:UsernameToken>
                </wsp:Policy>
            </sp:SignedSupportingTokens>
        </wsp:All>
    </wsp:ExactlyOne>
</wsp:Policy>

Now all the configuration files are in place. Now, we can go ahead, and write java code to retrieve the sts tokens.


STS Service Invocation


1. First, we need to set the trust-store of wso2 is as a system property since we are invoking a https endpoint. And, then, we will read the spring beans file.

System.setProperty("javax.net.ssl.trustStore",
        "/opt/wso2/wso2is-4.6.0/repository/resources/security/client-truststore.jks");
System.setProperty("javax.net.ssl.trustStorePassword", "wso2carbon");

2. Next, we should read the spring bean file, wssec-sts-bean.xml, and get the bean we created.

ApplicationContext ctx = new FileSystemXmlApplicationContext(
        "classpath:wssec-sts-bean.xml");
STSClient sts = (STSClient) ctx.
        getBean("{http://ws.apache.org/axis2}wso2carbon-stsHttpsSoap12Endpoint.sts-client");


3. Now, we have the STSClient instance. We need to set some attributes to the client before we can request security tokens. One is the policy we just extracted from the WSDL.

//parse the ut policy xml, and get a DOM element
File f = new File("src/main/resources/sts.policy.xml");
Element stsPolicy = loadPolicy(f.getAbsolutePath());
sts.setPolicy(stsPolicy);

sts.setTokenType("http://docs.oasis-open.org/wss/oasis-wss-saml-token-profile-1.1#SAMLV2.0");
sts.setKeyType("http://schemas.xmlsoap.org/ws/2005/02/trust/Bearer");
sts.setSoap11(false);


4. Then, we can go ahead and request sts tokens.

SecurityToken samlToken = 
        sts.requestSecurityToken("http://localhost:9453/services/echo",
        "http://schemas.xmlsoap.org/ws/2005/02/trust/RST/SCT",
        "/Issue", null);

//convert the token dom element to string
String token = ((DOMImplementationLS) samlToken.getToken().getOwnerDocument().getImplementation()).
        createLSSerializer().writeToString(samlToken.getToken().getOwnerDocument());
System.out.println(token);

With these steps, you should be able to invoke STS service in WSO2 Identity Server using a CXF client. You can download the full source of this from here - http://goo.gl/Dpmjee

Testing 


1. Start WSO2 Identity Server 4.6.0.
2. Secure STS Service with UsernameToken as described in this documentation - https://docs.wso2.org/display/IS460/Securing+the+Security+Token+Service
3. Extract the client, cxf-sts-w-wso2-is.zip
4. Run the client as follows.

mvn clean install -Pclient


Friday, May 2, 2014

Different ways to Revert GIT commits


In GIT, there are different requirements to revert changes. This includes reverting local changes in your working copy, revert a commit already made, rewrite already pushed GIT history etc. I'll show you how to do these in this blog. The `git log` I have used can be found at the end of this article.

  • To temporarily go back to a old revision, fool around, then come back to where you are, then you should checkout the desired commit.
git checkout 1f5d1eb7e

If you want to make some commits while you are in this older revision:
git checkout -b old_revision_branch 1f5d1eb7e


But, if you want to completely remove the commits you have made since a given revision, then there are two routes to go:

1. If you have pushed any commits:
#This will destroy all your local modifications:
git reset --hard 1f5d1eb7e

#But, if you have local work to keep:
git stash
git reset --hard 1f5d1eb7e
git stash pop
#This saves the modifications (git stash), and re-applies (git stash pop) it on top of the reset copy. You might get merge conflicts.

2. If you have already pushed the work:
Then you might not want to actually remove all the commits which will effectively rewrite the history. But what you can do is you can revert the commits. With git, revert has a very specific meaning: create a commit with a reverse patch to cancel it out. This way, you don't rewrite any history.

# This will create three separate commits
git revert 2ce3f91c4 0cc5599c5 3e5f8805a

# It also takes ranges. This will revert the last two commits:
git revert HEAD~2..HEAD

#Finally, commit
git commit


`git log`

commit 3e5f8805aa06d80d50f130107d48e4ec67289719
Author: Kasun Gajasinghe <kasung@wso2.com>
Date:   Wed Apr 30 02:14:20 2014 +0530

    cleaning up cxf ws-discovery

commit 0cc5599c57f443a937affcd2045617d8660a58e4
Author: Kasun Gajasinghe <kasung@wso2.com>
Date:   Wed Apr 30 01:51:51 2014 +0530

    moving APIScanner class to correct package

commit 2ce3f91c4262749ca262ddc0bf75924f13bbb485
Author: Kasun Gajasinghe <kasung@wso2.com>
Date:   Wed Apr 30 01:45:12 2014 +0530

    Adding support to read the WSDL 1.1 wsdl:portType from the JAX-WS annotations.

commit 1f5d1eb7ef6152de32f5c8282e765f3e8aaa6468
Author: chanikag <chanika@wso2.com>
Date:   Mon Apr 28 08:37:07 2014 +0530

    upgrade data-bridge conmponent to revision 201003

commit 64958bc9df641b3628d6d88ed39acb5e37eae688
Author: Chamath Gunawardana <chamathg@gmail.com>
Date:   Fri Apr 25 12:56:20 2014 +0530

    Updating pom

This was generously inspired from a Stackoverflow answer at http://stackoverflow.com/questions/4114095/revert-to-previous-git-commit

Monday, February 10, 2014

Resolve activation Module not found issue in WSO2 ESB 4.8.0


When you were upgrading your WSO2 ESB pfrom 4.7.0 or older version to 4.8.0, you might notice the following issue.  Caused by: org.wso2.carbon.CarbonException: Axis Module not found for : activation-2.1.2

This error happens if you migrate the ESB_HOME/repository/deployment/server/servicemetafiles/ folder to the ESB 4.8.0 or a later version. The reason is that activation module is not shipped with ESB anymore, but the servicemetafiles from the older version might still contain references to activation module. Since ESB cannot find that module, it throws the following error, and the proxy service fails to deploy.

To resolve this issue, you have to edit the metafiles to remove references to activation module. There, you might notice, the references like follows. The version might differ.

         <module name="activation" version="2.1.2" type="engagedModules"/>

Simply remove this line from the metafile, and then the proxy services will deploy successfully. You can create a script to do this if you have several proxy services / axis2 services.


[2014-02-10 13:02:09,156] ERROR - PersistenceMetaDataDeployer Unable to handle service initialization. Service: myProxyService
org.wso2.carbon.core.persistence.PersistenceException: Unable to handle service initialization. Service: myProxyService
    at org.wso2.carbon.core.persistence.AbstractPersistenceManager.handleExceptionWithRollback(AbstractPersistenceManager.java:582)
    at org.wso2.carbon.core.persistence.ServicePersistenceManager.handleExistingServiceInit(ServicePersistenceManager.java:747)
    at org.wso2.carbon.core.persistence.file.deployer.PersistenceMetaDataDeployer.deploy(PersistenceMetaDataDeployer.java:96)
    at org.apache.axis2.deployment.repository.util.DeploymentFileData.deploy(DeploymentFileData.java:136)
    at org.apache.axis2.deployment.DeploymentEngine.doDeploy(DeploymentEngine.java:807)
    at org.apache.axis2.deployment.repository.util.WSInfoList.update(WSInfoList.java:144)
    at org.apache.axis2.deployment.RepositoryListener.update(RepositoryListener.java:377)
    at org.apache.axis2.deployment.RepositoryListener.checkServices(RepositoryListener.java:254)
    at org.apache.axis2.deployment.RepositoryListener.startListener(RepositoryListener.java:371)
    at org.apache.axis2.deployment.scheduler.SchedulerTask.checkRepository(SchedulerTask.java:59)
    at org.apache.axis2.deployment.scheduler.SchedulerTask.run(SchedulerTask.java:67)
    at org.wso2.carbon.core.deployment.CarbonDeploymentSchedulerTask.runAxisDeployment(CarbonDeploymentSchedulerTask.java:79)
    at org.wso2.carbon.core.deployment.CarbonDeploymentSchedulerTask.run(CarbonDeploymentSchedulerTask.java:124)
    at java.util.concurrent.Executors$RunnableAdapter.call(Executors.java:439)
    at java.util.concurrent.FutureTask$Sync.innerRunAndReset(FutureTask.java:317)
    at java.util.concurrent.FutureTask.runAndReset(FutureTask.java:150)
    at java.util.concurrent.ScheduledThreadPoolExecutor$ScheduledFutureTask.access$101(ScheduledThreadPoolExecutor.java:98)
    at java.util.concurrent.ScheduledThreadPoolExecutor$ScheduledFutureTask.runPeriodic(ScheduledThreadPoolExecutor.java:180)
    at java.util.concurrent.ScheduledThreadPoolExecutor$ScheduledFutureTask.run(ScheduledThreadPoolExecutor.java:204)
    at java.util.concurrent.ThreadPoolExecutor$Worker.runTask(ThreadPoolExecutor.java:895)
    at java.util.concurrent.ThreadPoolExecutor$Worker.run(ThreadPoolExecutor.java:918)
    at java.lang.Thread.run(Thread.java:662)
Caused by: org.wso2.carbon.CarbonException: Axis Module not found for : activation-2.1.2
    at org.wso2.carbon.core.persistence.AbstractPersistenceManager.getExistingAxisModule(AbstractPersistenceManager.java:562)
    at org.wso2.carbon.core.persistence.ServicePersistenceManager.handleExistingServiceInit(ServicePersistenceManager.java:472)
    ... 20 more

Saturday, February 1, 2014

Merge WSO2 Carbon products using Maven


It's a common requirement for users of WSO2 to combine multiple WSO2 products together everything can be run within one JVM instance. Because of component architecture of WSO2 Carbon, you can combine features from several into one product which would help some deployments. Some of the common products that get merged together are AS + DSS + BPS, ESB + IS, BAM + CEP. The default way to install products/features is to use the 'Feature Manager' in the management console. But users might want to merge products via Apache Maven. This is done by creating a maven pom.xml, and leveraging carbon-p2-plugin.

Following steps guide you on how to create merge features from different products together.

Pre-requisites -

Apache Maven 3.0.x and Apache Ant are required.

Steps -

  1.  Create a directory, and add the following in a file named pom.xml. Let's call this directory as $BASE_DIR
  2.  Download the P2-repo at http://dist.wso2.org/p2/carbon/releases/turing.tar.gz
  3.  Extract the turing.tar.gz to $BASE_DIR/p2-repo. Now, the content.jar should be located at $BASE_DIR/p2-repo/content.jar
  4.  Add the features you want additionally to the pom.xml. The sample contains two features - org.wso2.carbon.webapp.mgt.feature.group, and org.wso2.carbon.logging.mgt.feature.group. The feature listings should look like the following. The features needed for each product can be found under the p2-profile-gen/pom.xml. For ex. the AS features - https://svn.wso2.org/repos/wso2/carbon/platform/branches/turing/products/as/5.2.1/modules/p2-profile-gen/pom.xml
            <feature>
                <id>org.wso2.carbon.webapp.mgt.feature.group</id>
                <version>${carbon.platform.version}</version>
            </feature> 
    
  5. Enter the command `mvn clean install`
  6. Your combined product will be built at $BASE_DIR/target/wso2carbon-x.x.x.


    <?xml version="1.0" encoding="utf-8"?>
    <project xmlns="http://maven.apache.org/POM/4.0.0"
         xmlns:xsi="http://www.w3.org/2001/XMLSchema-instance"
         xsi:schemaLocation="http://maven.apache.org/POM/4.0.0 http://maven.apache.org/maven-v4_0_0.xsd">
    <parent>
        <groupId>org.wso2.appserver</groupId>
        <artifactId>wso2appserver-parent</artifactId>
        <version>5.2.0</version>
    </parent>
    
    <modelVersion>4.0.0</modelVersion>
    <artifactId>wso2product-p2-gen</artifactId>
    <packaging>pom</packaging>
    <name>WSO2 Product Profile Generation</name>
    <url>http://wso2.org</url>
    
    <build>
    <plugins>
        <plugin>
            <groupId>org.apache.maven.plugins</groupId>
            <artifactId>maven-dependency-plugin</artifactId>
            <version>2.8</version>
            <inherited>false</inherited>
            <executions>
                <execution>
                    <id>1-unpack-p2-agent-distribution</id>
                    <phase>test</phase>
                    <goals>
                        <goal>unpack</goal>
                    </goals>
                    <configuration>
                        <artifactItems>
                            <artifactItem>
                                <groupId>org.wso2.carbon</groupId>
                                <artifactId>wso2carbon-core</artifactId>
                                <version>${carbon.kernel.version}</version>
                                <type>zip</type>
                                <overWrite>true</overWrite>
                                <outputDirectory>target</outputDirectory>
                            </artifactItem>
                        </artifactItems>
                    </configuration>
                </execution>
                <execution>
                    <id>unpack-equinox-executable</id>
                    <phase>test</phase>
                    <goals>
                        <goal>unpack</goal>
                    </goals>
                    <configuration>
                        <artifactItems>
                            <artifactItem>
                                <groupId>org.eclipse.equinox</groupId>
                                <artifactId>org.eclipse.equinox.executable</artifactId>
                                <version>3.5.0.v20110530-7P7NFUFFLWUl76mart</version>
                                <type>zip</type>
                                <overWrite>true</overWrite>
                                <outputDirectory>target</outputDirectory>
                            </artifactItem>
                        </artifactItems>
                    </configuration>
                </execution>
            </executions>
        </plugin>
        <plugin>
            <groupId>org.wso2.maven</groupId>
            <artifactId>carbon-p2-plugin</artifactId>
            <version>${carbon.p2.plugin.version}</version>
            <executions>
              <execution>
                    <id>3-p2-profile-generation</id>
                    <phase>package</phase>
                    <goals>
                        <goal>p2-profile-gen</goal>
                    </goals>
                <configuration>
                    <profile>default</profile>
                    <metadataRepository>file:${basedir}/p2-repo</metadataRepository>
                    <artifactRepository>file:${basedir}/p2-repo</artifactRepository>
                    <destination>
                        ${basedir}/target/wso2carbon-core-${carbon.kernel.version}/repository/components
                    </destination>
                    <deleteOldProfileFiles>true</deleteOldProfileFiles>
                    <features>
                        <!-- ### Add your features here ### -->
                        <feature>
                            <id>org.wso2.carbon.logging.mgt.feature.group</id>
                            <version>${carbon.platform.version}</version>
                        </feature>
    
                        <feature>
                            <id>org.wso2.carbon.webapp.mgt.feature.group</id>
                            <version>${carbon.platform.version}</version>
                        </feature>
    
                    </features>
                </configuration>
              </execution>
    
            </executions>
        </plugin>
        <plugin>
            <groupId>org.apache.maven.plugins</groupId>
            <artifactId>maven-antrun-plugin</artifactId>
            <version>1.1</version>
            <executions>
                <execution>
                    <phase>package</phase>
                    <configuration>
                        <tasks>
                            <replace token="false" value="true"
                                     dir="target/wso2carbon-core-${carbon.kernel.version}/repository/components">
                                <include name="**/bundles.info"/>
                            </replace>
                        </tasks>
                    </configuration>
                    <goals>
                        <goal>run</goal>
                    </goals>
                </execution>
            </executions>
        </plugin>
    </plugins>
    </build>
    <properties>
       <carbon.platform.version>4.2.0</carbon.platform.version>
       <carbon.kernel.version>4.2.0</carbon.kernel.version>
    </properties>
    
    <repositories>
         <repository>
            <id>wso2-nexus</id>
            <name>WSO2 internal Repository</name>
            <url>http://maven.wso2.org/nexus/content/groups/wso2-public/</url>
            <releases>
                <enabled>true</enabled>
                <updatePolicy>daily</updatePolicy>
                <checksumPolicy>ignore</checksumPolicy>
            </releases>
        </repository>
    </repositories>
    
    <pluginRepositories>
        <pluginRepository>
            <id>wso2-maven2-repository-1</id>
            <url>http://dist.wso2.org/maven2</url>
        </pluginRepository>
        <pluginRepository>
            <id>wso2-maven2-repository-2</id>
            <url>http://dist.wso2.org/snapshots/maven2</url>
        </pluginRepository>
     </pluginRepositories>
    </project>
    

    Wednesday, January 22, 2014

    HowTo: One ESB - Two isolated ActiveMQ instances


    There is sometimes a need to point WSO2 ESB to two separate ActiveMQ instances which are independent from each other. So, there will be different queues in these ActiveMQ instances. And, in the proxy configuration we can specify which ActiveMQ instance to use. Following samples explain how to do this. While this blog post focus on ActiveMQ, you follow quite the same steps for other message brokers like WSO2 MB, IBM MQ etc.


    jms transportReceiver section of axis2.xml would look like below.

    <transportReceiver name="jms" class="org.apache.axis2.transport.jms.JMSListener">
      <parameter name="myTopicConnectionFactory" locked="false">
        <parameter name="java.naming.factory.initial" locked="false">org.apache.activemq.jndi.ActiveMQInitialContextFactory</parameter>
        <parameter name="java.naming.provider.url" locked="false">tcp://localhost:61616</parameter>
        <parameter name="transport.jms.ConnectionFactoryJNDIName" locked="false">TopicConnectionFactory</parameter>
        <parameter name="transport.jms.ConnectionFactoryType" locked="false">topic</parameter>
      </parameter>
      
      <parameter name="myQueueConnectionFactory" locked="false">
        <parameter name="java.naming.factory.initial" locked="false">org.apache.activemq.jndi.ActiveMQInitialContextFactory</parameter>
        <parameter name="java.naming.provider.url" locked="false">tcp://localhost:61616</parameter>
        <parameter name="transport.jms.ConnectionFactoryJNDIName" locked="false">QueueConnectionFactory</parameter>
        <parameter name="transport.jms.ConnectionFactoryType" locked="false">queue</parameter>
       </parameter>
      
       <parameter name="default" locked="false">
         <parameter name="java.naming.factory.initial" locked="false">org.apache.activemq.jndi.ActiveMQInitialContextFactory</parameter>
         <parameter name="java.naming.provider.url" locked="false">tcp://localhost:61616</parameter>
         <parameter name="transport.jms.ConnectionFactoryJNDIName" locked="false">QueueConnectionFactory</parameter>
         <parameter name="transport.jms.ConnectionFactoryType" locked="false">queue</parameter>
       </parameter>
       </transportReceiver>
    
    
    • Note the parameter names that's been set - for queues, there is configurations under 'myQueueConnectionFactory' and under 'default'
    • Now, let's go ahead and add the configurations for the other ActiveMQ instance. For that, add another <parameter> under the jms <transportReceiver> and set the java.naming.provider.url to point to the new ActiveMQ instance. Also note the parameter name you have set. Now, the <transportReceiver> section of axis2.xml would look like the following.
     <transportReceiver name="jms" class="org.apache.axis2.transport.jms.JMSListener">
           <parameter name="myTopicConnectionFactory" locked="false">
                <parameter name="java.naming.factory.initial"  locked="false">org.apache.activemq.jndi.ActiveMQInitialContextFactory</parameter>
               <parameter name="java.naming.provider.url" locked="false">tcp://localhost:61616</parameter>
                <parameter name="transport.jms.ConnectionFactoryJNDIName"  locked="false">TopicConnectionFactory</parameter>
                <parameter name="transport.jms.ConnectionFactoryType" locked="false">topic</parameter>
           </parameter>
      
           <parameter name="myQueueConnectionFactory" locked="false">
                <parameter name="java.naming.factory.initial"  locked="false">org.apache.activemq.jndi.ActiveMQInitialContextFactory</parameter>
               <parameter name="java.naming.provider.url" locked="false">tcp://localhost:61616</parameter>
                <parameter name="transport.jms.ConnectionFactoryJNDIName"  locked="false">QueueConnectionFactory</parameter>
                <parameter name="transport.jms.ConnectionFactoryType" locked="false">queue</parameter>
           </parameter>
    
    
           <parameter name="secondQueueConnectionFactory" locked="false">
                <parameter name="java.naming.factory.initial"  locked="false">org.apache.activemq.jndi.ActiveMQInitialContextFactory</parameter>
               <parameter name="java.naming.provider.url" locked="false">tcp://mq2.example.com:61616</parameter>
                <parameter name="transport.jms.ConnectionFactoryJNDIName"  locked="false">QueueConnectionFactory</parameter>
                <parameter name="transport.jms.ConnectionFactoryType" locked="false">queue</parameter>
           </parameter>
      
           <parameter name="default" locked="false">
                <parameter name="java.naming.factory.initial"  locked="false">org.apache.activemq.jndi.ActiveMQInitialContextFactory</parameter>
               <parameter name="java.naming.provider.url" locked="false">tcp://localhost:61616</parameter>
                <parameter name="transport.jms.ConnectionFactoryJNDIName"  locked="false">QueueConnectionFactory</parameter>
                <parameter name="transport.jms.ConnectionFactoryType" locked="false">queue</parameter>
           </parameter>
       </transportReceiver>
    

     Now, the ESB configuration is complete. What's left is to instruct a JMS proxy service to which jms connection factory to use. We use the service level parameter, transport.jms.ConnectionFactory, to specify the connection factory name. If you did not specify any name, ESB will use the connection factory configuration under 'default'.

    A sample proxy service that uses the newly defined activemq instance would look like the following. Note the value set for the transport.jms.ConnectionFactory.

    <?xml version="1.0" encoding="UTF-8"?>
    <proxy xmlns="http://ws.apache.org/ns/synapse" name="remoteJMSProxy" transports="jms" startOnLoad="true" trace="disable">
      <target>
        <inSequence>
          <property name="OUT_ONLY" value="true" scope="default"/>
            <send>
              <endpoint>
                <address uri="http://localhost:9763/services/echo" format="soap11"/>
              </endpoint>
            </send>
        </inSequence>
        <outSequence/>
      </target>
    
      <parameter name="transport.jms.ContentType">
        <rules>
          <jmsProperty>contentType</jmsProperty>
            <default>text/xml</default>
        </rules>
      </parameter>
    
      <parameter name="transport.jms.ConnectionFactory">remoteQueueConnectionFactory</parameter>
    
    </proxy>


    Tuesday, August 27, 2013

    Install Subversion 1.6 in Ubuntu 13.04


    As you know, we can't perform svn commands on a Subversion 1.6 working copy using a Subversion 1.7 client. But in Ubuntu 13.04, the default Subversion package is 1.7. 1.7 is certainly far superior in comparison to 1.6 in terms of speed. But I need to be able to do svn operations on 1.6 working copies. So, I needed two versions of subversion client. The only way I found for this is the following. This might help you too.

    We need Java for this to work. So, if you do not have Java installed, install it before continuing.

    First, install svnkit.. This installs several packages that is needed for svnkit. In 13.04, we get the svnkit 1.7.5 which comes with support for Subversion 1.7.

    sudo apt-get install svnkit

    Now, uninstall svnkit and libsvnkit-java packages. We do not need the 1.7.5 version of these since we need Subversion 1.6 support.

    sudo apt-get remove svnkit libsvnkit-java

    Now, go to a Ubuntu mirror site. I have used the Ubuntu mirror site for Sri Lanka.
    http://lk.archive.ubuntu.com/ubuntu/pool/universe/s/svnkit/

    There, download, and install the following two packages.

    libsvnkit-java_1.3.5+dfsg-3_all.deb
    svnkit_1.3.5+dfsg-3_all.deb

    You can install these by using the command "sudo dpkg -i *deb" command or simply double-clicking in these.

    Now, you have SVN 1.6 installed. To run, use the command jsvn instead of svn.

    jsvn --version

    You might need to set the JAVA_HOME variable if jsvn is failing to locate java. If so, open up /usr/bin/jsvn (which is a simple bash script), and edit the JAVA_HOME variable there accordingly.

    Good luck!


    Thursday, July 18, 2013

    WS-Discovery with CXF-based JAX-WS/JAX-RS in WSO2 AS

    Apache CXF has added out-of-the-box support for WS-Discovery for CXF based JAX-WS and JAX-RS services starting from CXF 2.7.x versions. This post describes how to add this support to WSO2 Application Server with WSO2 Governance Registry (GReg) acting as the DiscoveryProxy receiver.

    All the WSO2 Carbon-based service hosting products like WSO2 Application Server supported WS-Discovery for axis2 services (including data services, proxy services etc.) for a long time. These products can be configured to announce the axis2 services to a Governance Registry instance. But we did not have a way to announce CXF-based JAX-WS and JAX-RS services. But with the out-of-the-box support for WS-Discovery that comes with CXF this is now possible. Following steps describes how to add WS-Discovery to jax webapps.

    1. Download the latest WSO2 Application Server (AS) pack.
    2. Copy the following three jars to {WSO2-AS-HOME}/lib/runtimes/cxf
      • cxf-services-ws-discovery-service  - version 2.7.5
      • cxf-services-ws-discovery-api  - version 2.7.5
      • mina-core - version 2.0.7
    3. Add a CXF Configuration File (cxf.xml) to the WEB-INF/classes/ location of a webapp.
    4. Add a bus property "org.apache.cxf.service.ws-discovery.address" which points to the DiscoveryProxy instance residing in GReg. To do that,
      1. Open up cxf.xml we added to the webapp before. There, under the 'cxf' bean (which uses the class org.apache.cxf.bus.spring.SpringBus), add the property "org.apache.cxf.service.ws-discovery.address" and set it to the DiscoveryProxy service URL of GReg. The default service URL is https://localhost:9443/services/DiscoveryProxy for a WSO2 GReg instance running in local machine with port offset 0. The properties are stored as a map. A sample cxf.xml would look like the following. [1]


    <property name="properties">
        <map>
            <entry key="org.apache.cxf.service.ws-discovery.address" value="https://localhost:9443/services/DiscoveryProxy" />
        </map>
    </property>


         5. Deploy the webapp


    [1] Sample cxf.xml

    <beans xmlns="http://www.springframework.org/schema/beans"
           xmlns:xsi="http://www.w3.org/2001/XMLSchema-instance"
           xmlns:context="http://www.springframework.org/schema/context"
           xsi:schemaLocation="
    http://www.springframework.org/schema/beans http://www.springframework.org/schema/beans/spring-beans.xsd
    http://www.springframework.org/schema/context http://www.springframework.org/schema/context/spring-context.xsd">
    
        <bean id="cxf" class="org.apache.cxf.bus.spring.SpringBus" destroy-method="shutdown">
            <property name="properties">
                <map>
                    <entry key="org.apache.cxf.service.ws-discovery.address" value="http://localhost:8080/services/DiscoveryProxy" />
                </map>
            </property>
        </bean>
    
        <bean id="org.apache.cxf.bus.spring.BusWiringBeanFactoryPostProcessor" 
            class="org.apache.cxf.bus.spring.BusWiringBeanFactoryPostProcessor"/>
        <bean id="org.apache.cxf.bus.spring.Jsr250BeanPostProcessor" 
            class="org.apache.cxf.bus.spring.Jsr250BeanPostProcessor"/>
        <bean id="org.apache.cxf.bus.spring.BusExtensionPostProcessor" 
            class="org.apache.cxf.bus.spring.BusExtensionPostProcessor"/>
    
    </beans>


    Sample Hello Message sent from AS to GReg

    <soap:Envelope xmlns:soap="http://www.w3.org/2003/05/soap-envelope"
                   xmlns:wsa="http://www.w3.org/2005/08/addressing"
                   xmlns:tns="http://docs.oasis-open.org/ws-dd/ns/discovery/2009/01">
        <soap:Header>
            <wsa:Action>http://docs.oasis-open.org/ws-dd/ns/discovery/2009/01/Hello</wsa:Action>
            <wsa:MessageID>urn:uuid:5063d2d5-4c8c-4f86-b1a0-9c3a17421af2</wsa:MessageID>
            <wsa:To>http://localhost:8080/services/DiscoveryProxy</wsa:To>
            <wsa:ReplyTo>
                <wsa:Address>http://www.w3.org/2005/08/addressing/none</wsa:Address>
            </wsa:ReplyTo>
        </soap:Header>
        <soap:Body>
            <ns2:Hello xmlns="http://www.w3.org/2005/08/addressing"
                       xmlns:ns2="http://docs.oasis-open.org/ws-dd/ns/discovery/2009/01">
                <EndpointReference>
                    <Address>urn:uuid:e67f250f-9402-4c53-bb1f-da1ffe985ebc</Address>
                </EndpointReference>
                <ns2:Types xmlns:ns3="http://server.hw.demo/">ns3:HelloWorld</ns2:Types>
                <ns2:Scopes/>
                <ns2:XAddrs>/hello_world</ns2:XAddrs>
                <ns2:MetadataVersion>1</ns2:MetadataVersion>
            </ns2:Hello>
        </soap:Body>
    </soap:Envelope>


    Monday, April 29, 2013

    Customize the height of header div of Docbook Webhelp in Docbook 1.78.1


    Recently, I've been getting some queries on how to change the height of the docbook webhelp html output. This has been straight forward in the previous releases where, where you just change the CSS height property of #header, #content, and #leftnavigation. But starting from Docbook xsl release of 1.78.0, you need to do an additional change to get it working because of the introduction of left panel resize handler.

    The left panel resize handler is a feature introduced with 1.78.0 to let the users resize it as they wish in case the contents of left navigation panel is not completely visible. {webhelp-dir}/template/common/splitterInit.js .  There, we divide the webhelp output in to main three sections. the 

    • North pane - #header
    • West pane - #sidebar
    • Center pane - #content

    Then, it gives you the ability to add resize handler to the edges of these three panes. In the case of webhelp, we have suppressed the ability of users to resize the north pane, and kept only the left pane resizable. I believe the reasons are obvious. So, that's a little intro about the resize handler. 

    Now, if you want to customize the header, first you need to few modifications to this file. Here, I'm explaining how to change the height of the #header.

    • First, open {webhelp-dir}/template/common/splitterInit.js
    • Look for the attribute north__minSize in that file. Currently, it has the value 99 which is in pixels. This values over-rides the #height css property in positioning.css. So, change this value to a height you like. 
    • Change the the height of #content, and #leftnavigation appropriately.
    You might want to replace the header-bg.png with a wider image too.


    Friday, April 26, 2013

    Highlights of WSO2 ESB 4.6.0 Documentation

    With WSO2 ESB 4.6.0 release, we have seen lot of improvements in several areas including the Passthru transport which provides far better performance compared to the NIO transport. The comparison include the latest ESBs of Talend, Mule and WSO2 ESB 4.5.1 vs WSO2 ESB 4.6.0. We have chosen to do the benchmark on two different WSO2 ESB versions to show the performance gain we have received. You can find the architectural details at Hiranya's blog How the World's Fastest ESB was Made.

    While these were, one of the complains WSO2 had was the lack of documentation. Some of the cool features go unnoticed because of this, and people have faced some difficulties finding what they want. So, after the release of Carbon 4.0.0 release, WSO2 has given special attention on getting the documentation right. We have held several documentation hackathons, discussions and we I believe we have come up with a decent set of documentation now.

    WSO2 promotes the documentation in the means of the WSO2 documentation site, WSO2 OT knowledge-base articles, blogs etc. This time, we have focused on our official documentation site, http://docs.wso2.org.

    So, I wanted to share the highlights of the documentation of WSO2 ESB 4.6.0. It shows the capabilities of ESB with examples covering quite a lot of use-cases of any given features with examples. We still have a lot to write, but I guess we have come a long way so far.

    The ESB 4.6.0 documentation is located here - http://docs.wso2.org/wiki/display/ESB460/Enterprise+Service+Bus+Documentation

    We can first start with the FAQ page - http://docs.wso2.org/wiki/display/ESB460/FAQ
    This is a good starting page to know whether WSO2 supports a given feature, where we can find the performance numbers, introduction to common components of ESB like endpoints, mediators, sequences etc.

    REST Supporthttp://docs.wso2.org/wiki/display/ESB460/REST+Support
    With WSO2, you can have REST support using either proxy services, or the rest api. Each of these are explained with a message flow diagrams, sample configuration proxy/rest-api, sample request, and response.

    JMS Supporthttp://docs.wso2.org/wiki/display/ESB460/Java+Message+Service+%28JMS%29+Support
    Explains how to use JMS with ActiveMQ, QPid, or the wso2 in-house AMQP implementation, Andes, with WSO2. Under the JMS usecases section, you will see that the common scenarios are covered.

    SAP Integraion -
    http://docs.wso2.org/wiki/display/ESB460/SAP+Integration
    Describes integrating SAP systems with WSO2 ESB

    Clustering WSO2 ESB - Worker-Manager separation with ELB
    http://docs.wso2.org/wiki/display/ESB460/Clustered+Deployment
    Explains how to setup the WSO2 worker-manager separation fronted by WSO2 Elastic Load Balancer.  Has detailed info on each of the configuration that needs to be made.

    The Samples Guidehttp://docs.wso2.org/wiki/display/ESB460/Samples
    The usual samples guide

    ESB Monitoringhttp://docs.wso2.org/wiki/display/ESB460/Monitoring+the+ESB
    Covers the JMX Monitoring, Monitoring the mediation, transport, system statistics among others.
    In addition to this, you can integrate WSO2 Business Activity Monitor (BAM) with WSO2 ESB, and see the detailed statistics employing MapReduce technologies. You can find more info here - http://docs.wso2.org/wiki/display/BAM220/Setting+up+Mediation+Data+Agent

    Performance Tuninghttp://docs.wso2.org/wiki/display/ESB460/Performance+Tuning

    Hope the above are useful.


    Thursday, April 25, 2013

    Run soapUI via Command-Line in Linux


    I always wanted to run soapui load tests via command line because then I could run it on a remote machine that I SSH to. I don't want to run it on my machine because it slows down the machine considerably, so I can't do my day-to-day work with it. That will also affect the result of soapui.

    Recently, I wanted to re-produce a OOM issue in WSO2 ESB. So, the setup was, the ESB instance was running on one server, soapui load tests, JConsole, and JProfiler on my machine. So, I only wanted to keep the monitoring softwares, ie. the JConsole, and JProfiler in my machine, and move the soapui tests to another server instance. It turned out this is actually pretty simple.

    First, start up the soapui gui interface, and save the project you already have. If you don't have one, create a new one, and set all the load tests parameters appropriately. These include setting the soap message, no. threads, time limit etc. Let's save it as myProxy-test-soapui-project.xml.

    This file, myProxy-test-soapui-project.xml, contains all the necessary information regarding the project. It include the WSDL file, the endpoints, load test info etc. This makes it easier run the same test on another machine. You just have to transfer this file. Then you can run the command in a terminal with soapui in place.


    • Transfer the saved soapui project file to the server where you wish to run the load tests. ex. scp
    • Download soaup from here - I got soapui-4.5.0-linux-bin.zip -  http://sourceforge.net/projects/soapui/files/soapui/4.5/
      • Let's called the extracted folder of this as $SOAPUI_HOME
    • Copy the following command, and change it to match your needs.


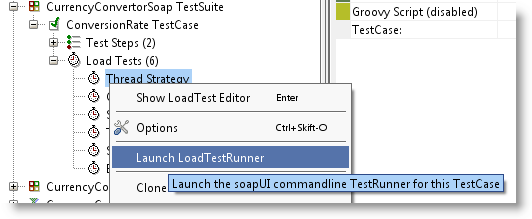
    sh $SOAPUI_HOME/bin/loadtestrunner.sh -s"TestSuite Name" -c"Testcase name" -l"LoadTest name" -r -f/home/kasun/load-tests/reports/ /home/kasun/load-tests/myProxy-test-soapui-project.xml

    Here, the names can be easily copied from the project hierarchy from the left-side Navigator tab.
    Example command look like the following. Run it with nohup, so the process won't be killed if you disconnect from the server. 


    sh /home/kasun/load-tests/soapui-4.5.0/bin/loadtestrunner.sh -s"myProxySoap11Binding TestSuite" -c"myProxySoap11Binding TestSuite" -l"LoadTest 1" -r -f/home/kasun/load-tests/reports/ /home/kasun/load-tests/myProxy-test-soapui-project.xml


    Tuesday, April 23, 2013

    Generating p2-repo for custom WSO2 Features, and Components


    Here, I'm going to discuss how to generate a p2-repo for custom, user-written WSO2 components, and features. This can be easily achieved using the maven plugin, carbon-p2-plugin, that WSO2 have written.
    First, you may have a look at Creating-your-own-wso2-carbon-components webinar to know how to write carbon components, and a feature for those components. It covers quite a lot of basics, and best practices as well.
    Now, to install these features to WSO2 products like WSO2 Enterprise Service Bus, you need to generate a p2-repository. Then, you can add that p2-repo via the "Feature Management" utility in management console, and install the features you want. p2-repo concept comes from the underline Eclipse equinox project that WSO2 products use. In the following I will tell you how to generate a p2-repo for your features.
    • Simply create a new maven project (packaging: pom)
    • Add carbon-p2-plugin as a maven plugin
        <plugin>
            <groupId>org.wso2.maven</groupId>
            <artifactId>carbon-p2-plugin</artifactId>
            <version>1.5.2</version>
            ---
        </plugin>
    • Then set the features you want to publish under the carbon-p2-plugin plugin configuration as shown in the following sample pom.xml.  
    • This sample pom.xml was copied from the p2-repo generation pom.xml of carbon 4.1.0, and I simplified it for clarity.
    • There are two sample feature definitions I have specified. Replace those featureArtifactDef with your own feature definitions. The format is $groupId:$artifactId:$version.

    I have tested this pom file, and it worked for me just fine. 
    When you build this via maven, maven creates the target/p2-repo directory. This has the p2-repository which contains the complete p2-repo including artifacts.jar and content.jar. You can just use this folder to install features, or you can host it somewhere. There're no special requirements on hosting.


    <project xmlns="http://maven.apache.org/POM/4.0.0"
             xmlns:xsi="http://www.w3.org/2001/XMLSchema-instance"
             xsi:schemaLocation="http://maven.apache.org/POM/4.0.0 http://maven.apache.org/maven-v4_0_0.xsd">
    
        <parent>
            <groupId>org.wso2.carbon</groupId>
            <artifactId>carbon-features</artifactId>
            <version>4.1.0</version>
        </parent>
    
        <modelVersion>4.0.0</modelVersion>
        <artifactId>mysample-feature-repository</artifactId>
        <version>4.1.0</version>
        <packaging>pom</packaging>
        <name>WSO2 Carbon - Feature Repository</name>
    
        <build>
          <plugins>
            <plugin>
              <groupId>org.wso2.maven</groupId>
                <artifactId>carbon-p2-plugin</artifactId>
                <version>1.5.2</version>
                <executions>
                  <execution>
                    <id>2-p2-repo-generation</id>
                    <phase>package</phase>
                    <goals>
                      <goal>p2-repo-gen</goal>
                     </goals>
                     <configuration>
                       <p2AgentLocation>${basedir}/target/p2-agent</p2AgentLocation>
                       <metadataRepository>file:${basedir}/target/p2-repo</metadataRepository>
                       <artifactRepository>file:${basedir}/target/p2-repo</artifactRepository>
                       <publishArtifacts>true</publishArtifacts>
                       <publishArtifactRepository>true</publishArtifactRepository>
                       <featureArtifacts> 
    
    <!-- change the featureArtifactDef to match your needs -->
                         <featureArtifactDef>
                            org.wso2.carbon:org.wso2.carbon.service.mgt.feature:4.1.0
                         </featureArtifactDef>
                         <featureArtifactDef>
                           org.wso2.carbon:org.wso2.carbon.registry.core.feature:4.1.0
                         </featureArtifactDef>
    
    
                   </featureArtifacts>
                 </configuration>
              </execution>
            </executions>
          </plugin>
        </plugins>
      </build>
    </project>


    Thursday, March 28, 2013

    Changes to webapp Classloading in WSO2 AS 5.1.0


    WSO2 Application Server 5.1.0 has introduced a major changes to the Webapp classloading mechanism with a new concept called configurable Runtime Environments. This provides solutions to classloading issues that was present is previous releases. Now, the users will be able to manipulate the webapp dependencies in a fine-grained manner. The current webapps will work just fine with this release, and will also provide an extension of support via a  newly introduced webapp-classloading.xml file.

    Starting from Carbon 4.0.0, WSO2 Application Server has gained a lot of momentum. There was special focus on it, and have added lot of major features. We have seen the introduction of CXF for providing full specification support for JAX-WS 2.2, and JAX-RS 2.0, inclusion of Jaggery with WSO2 AS, and a lot of cool features. See the AS 5.0.0 release notes to get a glimpse of those.

    With the introduction of the Runtime Environments, now users can control the classloading per-server or per-application. Users can define own runtimes for advanced usages but default runtimes are sufficient for most of the cases. You can control the classloader hierarchy using these Runtimes.
    There are 3 default runtimes on AS - Tomcat env, Carbon env, and CXF env.

    1. Tomcat Environment – This is the minimal runtime and is identical to pure Tomcat runtime. Only Tomcat, Servlet, JSP, EL, JSTL are available on server level Classpath. If a user wants additional Jars they need to be packaged with web application or should be placed on Tomcat Environment extension directory. 
    2. Carbon Environment - Tomcat Environment + Carbon Environment. This does not provide CXF or Spring dependencies. If a user wants additional Jars they need to be packaged with web application or should be placed on Carbon Environment extension directory.
    3. CXF Environment - Tomcat Environment + CXF + Spring - CARBON. This does not provide top access Carbon runtime. If a user wants additional Jars they need to be packaged with web application or should be placed on CXF Environment lib directory.


    How to Configure

    There is a new configuration file called webapp-classloading.xml which was introduced to configure webapp Classloading behavior per-server/per-application basis. This file need to be placed inside META-INF directory of a web application.

    ie. {webapp}/META-INF/webapp-classloading.xml

    This is quite a simple file containing only one parameter. It would look like the following. 

    webapp-classloading.xml


    <Classloading xmlns="http://wso2.org/projects/as/classloading">
       <Environments>{Runtime-Environment-Names}</Environments>
    </Classloading>
    

    Possible values that you can set for {Runtime-Environment-Names} include,
    • Tomcat
    • Carbon
    • CXF
    • CXF,Carbon
    • {Custom-Exclusive-Env}
    • {Custom-Exclusive-Env},Carbon
    e.g – To specify CXF as the runtime environment users should have the following configuration.

    <?xml version="1.0" encoding="UTF-8"?>
    <Classloading xmlns="http://wso2.org/projects/as/classloading">
       <Environments>CXF</Environments>
    </Classloading>

    Note:
    • It is possible to specify a combination of environments.
      • E.g – To access some Carbon features on a CXF applications it is possible to specify environment as 'CXF,Carbon'. Order is not important which means 'CXF,Carbon' and 'Carbon,CXF' have the same effect.

    Runtime Environment extensions

    It is a common requirement to share dependencies among number of applications without packaging with each and every application. In such cases following extensions directories can be used to place common dependencies.
    1. Tomcat Environment - ${carbon.home}/lib/runtimes/ext/
    2. Carbon Environment - ${carbon.home}/repository/components/lib
    3. CXF or any Custom Environment – Environment's lib directory. I will explain how to add a custom environment in the next section.
      1. e.g - ${carbon.home}/lib/runtimes/cxf 
      2. e.g - ${carbon.home}/lib/runtimes/ABC
    Note :-
    Dependencies placed on Tomcat Environment extension directory are visible to all the environments and it is required to identify the impact before placing dependencies on above environments. As an example placing incompatible Spring Dependencies on ${carbon.home}/lib/runtimes/ext/ can cause issues on CXF runtime environment (CXF environment also contains Spring dependencies). In such cases those incompatible dependencies should be packaged inside the web application and should deploy with Tomcat Environment configuration, then other application won't be effected.

    Adding custom Runtime Environments


    By adding new <ExclusiveEnvironments> entry to the {carbon.home}/repository/conf/tomcat/webapp-classloading-environments.xml file users can define custom runtimes. But this is recommended for advanced usages only. You will not need this in most common use-cases.
    e.g – Define a custom Runtime Environment for Spring
    • Add following entry to {carbon.home}/repository/conf/tomcat/webapp-classloading-environments.xml file.

    <ExclusiveEnvironments>
        <ExclusiveEnvironment>
            <Name>Spring</Name>
            <Classpath>${carbon.home}/lib/runtimes/spring/*.jar;${carbon.home}/lib/runtimes/spring/</Classpath>
        </ExclusiveEnvironment>
    </ExclusiveEnvironments> 
    
    • Create and copy related Spring dependencies to the {carbon.home}/lib/runtimes/spring/ directory. As you see, the directory name is derived from the Classpath attribute we just set above.

    Miscellaneous

    • AS 5.1.0 ships core CXF 2.7.3 dependencies and core Spring 3.0.7 dependencies under CXF runtime environment. If users want to upgrade to different CXF versions they are two options available.
      • Upgrade CXF runtime environment – Users can remove existing CXF/Spring and dependent Jars from “{carbon.home}/lib/runtimes/cxf” directory and can place new CXF/Spring Jars. 
      • Instead of upgrading server level CXF dependencies, users can package all the required Jars with in the Web-INF/lib directory of the application and deploy it with "Tomcat" runtime environment.
    • If the user want to add optional CXF/Spring jars, they can copy them into "{carbon.home}/lib/runtimes/cxf" directory but need to ensure those new dependencies are compatible with existing CXF/Spring Jars.